Today we’re going walk through how we can quickly set ourselves up with a database to act as a local data warehouse that we can play with during the development stage of our data pipeline.
The requirements for our DEV data warehouse are the following:
- Minimal overhead – quick and easy to get started (no complicated IT requirements)
- Easily repeatable and reproducible so that we can pick-up and work from the same point at different times
- Functional with enough features so that our processes are similar to what a final PROD solution might look like
With these requirements in mind, the best option for us to get our feet wet with developing some of our initial data processes is to use a local Postgresql database that we can easily spin up-and-down with docker and docker compose. Since we’re in the initial development stages of our pipeline, we’re not too concerned with whether we will use Postgresql for our PROD data warehouse. We’re just looking for an environment that we can jump into in an afternoon and start building. Many of the steps & procedures we create will translate to any data warehouse solution we might pick for our PROD data warehouse.
Let’s jump right in and get building. Make sure you have Docker and Docker Compose installed on your machine (follow the installation instructions here if you don’t already have them).
Creating A Database with Docker and Docker Compose
Create a new folder for this project and, in your text-edit/or of choice (see mine here) create a new file called docker-compose.yml and add these lines
version: "3.9"

services:
  postgres-dwh:
    image: postgres:latest
    ports:
      - "5432:5432"
    environment:
      POSTGRES_USER: admin
      POSTGRES_PASSWORD: admin
    volumes:
      - company-dwh:/var/lib/postgresql/data

volumes:
  company-dwh: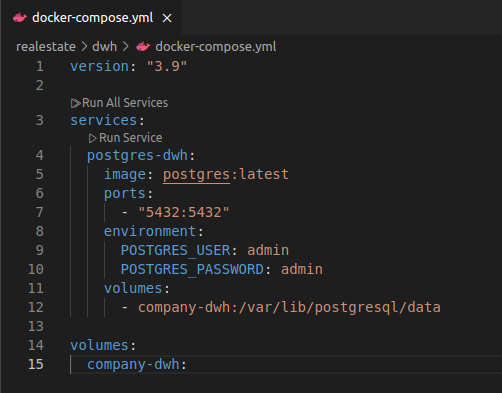
In the terminal run the command docker compose up --build …. voila, we have a database.
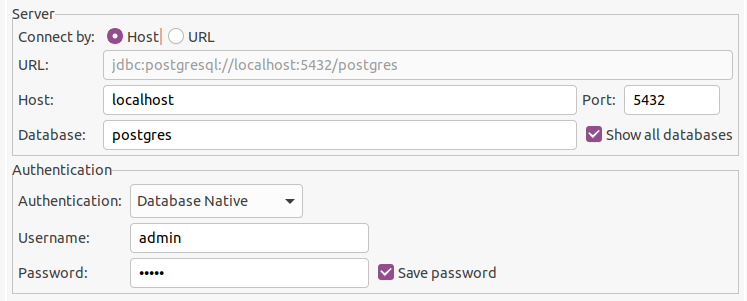
Here’s what you need to fill into the connection details in order to connect to it from your client (note the Username and Password must match the POSTGRES_USER and POSTGRES_PASSWORD environment variables set in our docker-compose.yml script. “postgres” is the default database created for us
A Few Modifications to our Database
If you were able to spin up the database and connect then you’re off to a good start. Now there’s a slight change we should make to our basic database to make sure that we can repeatably set it up as a DEV environment for our data pipeline project.
To start, create a sub-directory in your project folder called scripts and another one within that called init.
Adding this line to our docker-compose.yml will cause Docker to run the scripts (in alphabetical order) in the init directory whenever the database is rebuilt
version: "3.9"

services:
  postgres-dwh:
    image: postgres:latest
    ports:
      - "5432:5432"
    environment:
      POSTGRES_USER: admin
      POSTGRES_PASSWORD: admin
    volumes:
      - company-dwh:/var/lib/postgresql/data
      - ./scripts/init:/docker-entrypoint-initdb.d

volumes:
  company-dwh:
Our scripts need to do 3 things (and will be contained within 3 separate files):
- 001_create_database.sql – Create our database (the one we will do our work in)
- 002_create_roles_and_schemas.sql – Create the user roles & schemas (separates the different stages of our data pipeline)
- 003_create_raw_tables.sql – Create the “raw” tables that will hold our initial data
If we can create scripts that will do these 3 things for us, then we will have a way to repeatably build an environment that we can do our development work in – and one that will behave consistently every time we need to work on it.
1. 001_create_database.sql
The script to create our database is very simple – one line (call your database whatever you want, just stay consistent throughout the entire tutorial):
create database company_dw;Below you will see that we will need to explicitly connect to our data base company_dw each time we run one of our automated scripts.
2. 002_create_roles_and_schemas.sql
We want to create roles that will have exclusive purposes. For instance, we would want a role called “transform” that we use to do all of our data transformations. This ensures that we can grant the relevant access and know that the tools and programs responsible for transformation of the data have the appropriate permissions.
To help follow the SQL code, roles, schemas and privileges are highlighted accordingly.
The roles we want are:
- dev – to use for developing our data pipeline
- loader – to load in the raw data from our data sources
- transform – to use within our data transformation tool and apply our logic and data processing steps
- bi – for our visualization tools to access our fully processed, ready-to-use data
\connect company_dw;

create role dw_dev login password 'dev' nosuperuser nocreatedb nocreaterole;
create role dw_loader login password 'loader' nosuperuser nocreatedb nocreaterole;
create role dw_transform login password 'transform' nosuperuser nocreatedb nocreaterole;
create role dw_bi login password 'bi' nosuperuser nocreatedb nocreaterole;

grant connect on database company_dw to dw_dev, dw_loader, dw_transform, dw_bi;
We also want to create our schemas. One for each of the different steps our data will take throughout the pipeline process. In the same script add the following code:
create schema if not exists raw;
create schema if not exists staging;
create schema if not exists marts;

grant usage on schema raw, staging, marts to dw_dev, dw_loader, dw_transform, dw_bi;
And for each schema we will grant the appropriate privileges to each of our roles:
-- raw
grant select, insert, update, delete on all tables in schema raw to dw_loader;
alter default privileges in schema raw grant select, insert, update, delete on tables to dw_loader;

grant select on all tables in schema raw to dw_transform, dw_dev;
alter default privileges in schema raw grant select on tables to dw_transform, dw_dev;

-- staging
grant select, insert, update, delete on all tables in schema staging to dw_transform;
alter default privileges in schema staging grant select, insert, update, delete on tables to dw_transform;

grant select on all tables in schema staging to dw_dev;
alter default privileges in schema staging grant select on tables to dw_dev;

-- marts
grant select, insert, update, delete on all tables in schema marts to dw_transform;
alter default privileges in schema marts grant select, insert, update, delete on tables to dw_transform;

grant select on all tables in schema marts to dw_dev, dw_bi;
alter default privileges in schema marts grant select on tables to dw_dev, dw_bi;
3. 003_create_raw_tables.sql
Now that we have our roles, schemas and privileges set up, we can create the raw tables that our data will be loaded into.
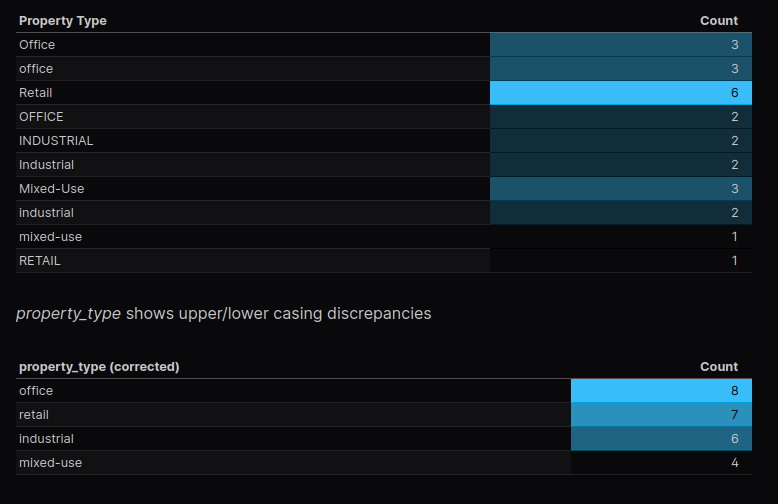
Each of our raw tables should contain a text column, type varchar(255), for each column in each of our data files – which we know well from the previous steps where we completed our data profiling exercise.
\connect company_dw;

-- leases

create table if not exists raw.leases (
    "lease_id" varchar(255),
    "property_id" varchar(255),
    "tenant_id" varchar(255),
    "lease_start_date" varchar(255),
    "lease_end_date" varchar(255),
    "leased_sqft" varchar(255),
    "monthlyRent" varchar(255),
    "notes" varchar(255)
);


-- properties

create table if not exists raw.properties (
    "property_id" varchar(255),
    "property_name" varchar(255),
    "property_type" varchar(255),
    "city" varchar(255),
    "state" varchar(255),
    "total_sqft" varchar(255),
    "year_built" varchar(255)
);

-- rent_payments

create table if not exists raw.rent_payments (
    "lease_id" varchar(255),
    "payment_month" varchar(255),
    "amount_due" varchar(255),
    "amount_paid" varchar(255),
    "payment_status" varchar(255)
);

-- tenants

create table if not exists raw.tenants (
    "tenant_id" varchar(255),
    "company_name" varchar(255),
    "industry" varchar(255),
    "num_employees" varchar(255)
);

-- vacancy_history

create table if not exists raw.vacancy_history (
    "property_id" varchar(255),
    "month" varchar(255),
    "vacancy_rate" varchar(255)
);


alter table raw.leases owner to dw_loader;
alter table raw.properties owner to dw_loader;
alter table raw.rent_payments owner to dw_loader;
alter table raw.tenants owner to dw_loader;
alter table raw.vacancy_history owner to dw_loader;
With these 3 scripts in place, we can again run the command docker compose up –build in our terminal and re-connect to our database
In our database company_dw you will see our schemas raw, staging, and marts

and our roles dw_dev, dw_loader, dw_transform, and dw_bi

Verify that you can connect to the database with the dw_dev role (remember the login password for this role is simply ‘dev’)

And also look for our tables in the raw schema

That’s it! Next article we will create a Python program that utilizes our dw_loader role to load the raw data from our source files into our newly created database tables.